
If you find your gorgeous hydrangeas wilting and are trying to figure out how to revive hydrangeas, look no further. This tried and true method works 100% of the time and only takes a few months. The results are truly amazing!
 Hydrangeas are one of my favorite types of flowers. There’s nothing more gorgeous than a fresh bunch of hydrangea blooms in the summer!
I typically get my hydrangeas at Trader Joe’s for under $7 a bunch. They’re super affordable and are always beautiful flowers.
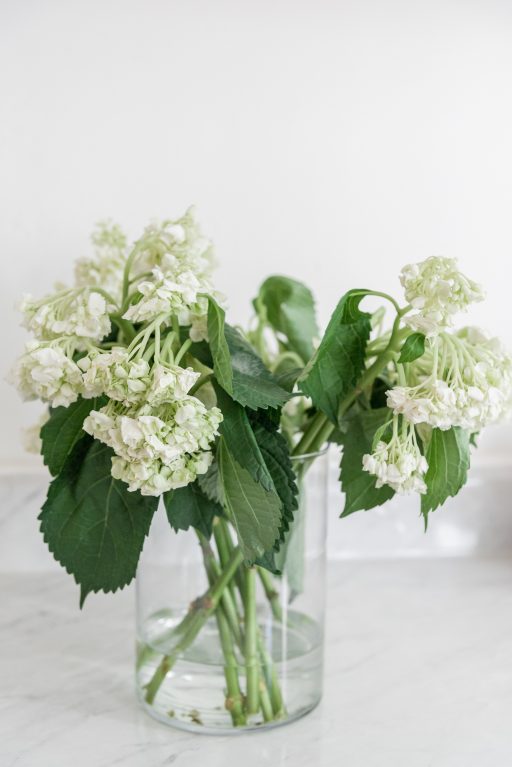
As much as I love hydrangeas (seriously, give me a bunch in any color), they like to wilt. Sometimes, I bring a gorgeous bunch of hydrangeas home only to find that they wilted on the way.
They’ll go from being fresh and lively to looking completely dead in the span of 20 minutes!
I didn’t always know how to revive hydrangeas, so I would just throw them out. Big mistake! With just a bit of work, my blooms now last for up to a week after I purchase them.
To be fair, sometimes a bunch of hydrangeas won’t wilt at all. But, when I see my hydrangeas wilting, it’s nice to know how to revive hydrangeas the right way.
I first started experimenting with how to revive hydrangeas when I had bought a bunch for a photoshoot the next day and woke up to some really sad blooms. It was a sponsored shoot and I definitely needed the flowers for it, so I went ahead and tried a few things I found online.
At first, it didn’t seem like anything was happening, so we went out and did one shoot (we needed the flowers for the second). I was super surprised to come home and find the blooms looking 100% alive! It was some serious magic.
I was even more surprised when the hydrangeas lasted another 3 days after the shoot with absolutely no extra care. There were no hydrangeas wilting in our house for the rest of the summer once I figured out how to stop it!
This method isn’t just a short term solution; it can make your hydrangeas last twice as long. I now use it every time I buy hydrangeas to double the lifespan of the blooms. Even if you don’t see your hydrangeas wilting, this method will prolong their lives.
After posting about it on my Instagram story, I realized how many other people have the exact same problem with their cut hydrangeas wilting. The response was huge! Clearly, we all love hydrangeas, but have trouble keeping them fresh and happy.
I then tried my method a few more times and found that it worked like a charm. In my opinion, this is the only method you should learn if you’re figuring out how to revive hydrangeas.
The one exception to all of this is if a bloom is 100% dead and wilted. If you blooms have been dead for days and are turning black then even this magic method won’t work.
However, blooms that have any life in them (green stems, colored blooms, etc.) will perk right up using this method. I added pictures of my “before” wilted blooms below so you can see what they looked like and how well it worked.
For those of you wondering, I’ve attempted this method with white, pink, and blue hydrangeas; in my experience it has worked equally well with every color.
I’m going to give a little bit of background on what causes wilting hydrangeas, but if you’re just interested in the method for how to fix your wilted hydrangeas right now, then skip to the bottom for a how-to card (it’s printable as well).
What Causes Wilting Hydrangeas?
Hydrangeas are a super unique flower. They have really cool properties, but some of their DNA makes it more likely to find your hydrangeas wilting than you’d see with other flowers.
Unlike many other flowers, hydrangeas produce a sticky sap that quickly clogs the end of the stem and doesn’t allow the plant to properly drink water.
Often, this happens because recently cut stems aren’t submerged in water quickly enough. If you trim your stems then wait a few minutes before putting the blooms in water, it might already be too late; the stems can become clogged that quickly.
If you’re cutting hydrangeas from your yard, you should consider bringing a vase of water out with you so that you can submerge the stems immediately.
The real issue with buying hydrangeas at the store is that re-cutting the stems won’t actually do that much. You know how we bring flowers home and trim the ends so they can drink again? Yeah, that doesn’t work with hydrangeas.
The sap in the hydrangea stems not only seals the end of the stem but the majority of it. You’d have to cut the stems away completely to avoid your hydrangeas wilting.
Once the sap has sealed the stem, you need to use a method that shocks the blooms into opening up so that they can drink. Once the stems are open and the flowers are drinking, you’re good to go.
I realized that many people think they know how to revive hydrangeas but don’t know the basic science behind it. Once I learned why it happens, I understood the process a lot more, so I hope this knowledge helps you too!
Why Do I See Hydrangeas Wilting Overnight?
Hydrangeas actually drink water through their blooms as well as their stems. This causes them to wilt especially easily in hot, dry climates. If you ever manage to get hydrangeas in the winter, then watch out – they will not be happy near a heater.
You will notice your hydrangeas wilting overnight, especially right after they’re cut, because their blooms are unable to consume any moisture from the dew or rain that they get in the outdoors.
In nature, hydrangeas love nighttime. It’s when they consume most of their water, so they are most prone to wilting at night when they’re not getting the water they’re used to.
You’ll need to help your hydrangea blooms get the excess water that they need in a different way because they usually can’t consume enough water from their stems alone.
Luckily, they drink from their flowers very easily, so this method to revive your wilting hydrangeas works really well!
If you’ve found that your hydrangeas died overnight often, then doing at least the first part of this method every morning will definitely prolong the life of your blooms.
How to Keep Hydrangeas From Wilting In the First Place
Obviously, learning how to revive hydrangeas is a great trick, but it would be better to simply avoid your cut hydrangeas wilting.
There isn’t any 100% sure way to do this, because hydrangeas are very delicate flowers, but there are techniques to give your blooms a better chance at surviving longer.
#1: Use Alum
Alum is a spice sold at most grocery stores that actually prevents your hydrangea stems from sealing over with the sap that hydrangeas produce.
After you cut a hydrangea bloom, dip the step in alum and make sure it’s fully coated before putting the stem in a vase of water. This simple step will definitely ensure that your hydrangeas live longer!
Now, I always use alum if I’m worried about my hydrangeas wilting (which is most of the time). It’s a cheap and quick way to get the most out of my flowers.
#2: Cut Off The Leaves
Hydrangea flowers need a lot of water to stay vibrant, but because the leaves are usually lower down on the stem, they’ll drink up the water first.
If you don’t mind going without the leaves, then cut them off before trimming your hydrangea stems and placing them in water. This will help the blooms last at least a bit longer and stay more full.
Sometimes, I don’t mind cutting the leaves off my blooms so I don’t wake up to my hydrangeas wilting, but other times I really enjoy the look of a bouquet with some greenery.
If you want to keep your leaves but are worried about your hydrangeas wilting, I recommend using both of the other methods, just to be safe.
#3: Cut The Stems At An Angle
This goes for most types of flowers as well, but trimming the end of the hydrangea stems at a diagonal before placing them in water gives the cutting more surface area to drink from.
After experimenting with this, I have found that hydrangeas tend to last at least 6 hours longer when the stem is cut at an angle.
If you’ve noticed your hydrangeas wilting overnight, then try cutting the stem diagonally and placing them in fresh water before going to bed next time.
#4: Replace The Water Often
As long as you’re not leaving your hydrangeas out of the water for more than 5 minutes while you change it, replacing your blooms’ water is one of the best ways to keep your flowers looking happy and healthy.
Hydrangea blooms drink a lot. In nature, they drink both through the ground and through the blooms because they need to consume so much water compared to other flowers.
Obviously, your hydrangea blooms can’t drink through the flowers themselves, so they’re already at a disadvantage. Therefore, you definitely need to make sure that they’re getting enough h20 through their stems.
Anytime I see my hydrangeas wilting or even starting to sag, I immediately cut the stems and change the water. Doing this before the sap totally seals the stem is much easier than reviving them.
Of course, this post is all about how to revive hydrangeas once they’re already wilted, but it never hurts to avoid getting to that point altogether!
The Method: How to Revive Hydrangeas
There are a few methods that people generally use to revive hydrangeas, but I’ve tried putting two different methods together and have had a 95% success rate or so.
Each method was created for a different issue. The first part is used when you first see your hydrangeas wilting, while the second part is used for hydrangeas that died overnight.
However, I combined both methods and find that doing them sequentially works better for either scenario.
I’ll list the steps in detail here, but you can also scroll down for a printable how-to card at the bottom!
Step 1: Shock Your Wilting Hydrangeas
Starting out, you will need to fill a sink with cold water. Use a tub or bucket if you prefer.
Ice cold water or cold water from the tap works best. The colder the better!
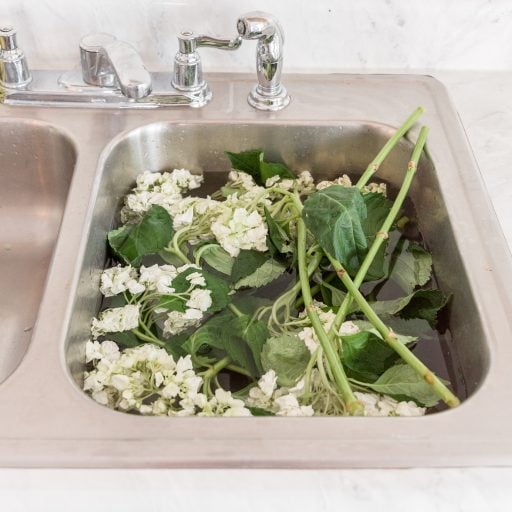
Place the cut blooms in the cold water and let them sit for at least 15 minutes.
The blooms won’t submerge completely, but make sure they are in the cold water as much as possible.
Step 2: Boil Water
While your hydrangeas are soaking, boil a few cups of water in a tea kettle or in the microwave.
It doesn’t need to be fancy; you just need really hot water for the next part.
Step 3: Submerge The Stems
After your hydrangeas have soaked for at least 15 minutes, remove the blooms from the cold water and trim the stems at a diagonal. Pour the boiling water into a shatter-proof glass and place the ends of the stems in the boiling water.
Make sure that you do this all within a few minutes (no more than 5) so the sap doesn’t seal over the ends of the stems again.
Let the blooms sit for as long as possible. Ideally, the hydrangeas would stay in the warm water until it turns to room temperature.
However, even if you can only let the stems sit in the water for 15 minutes or so, that will be a huge help.
This may cause the ends of the stems to turn brown (because you’re effectively burning them in the hot water), but it’s a small price to pay for flowers that last 2-3 times as long. You need the boiling water to shock the hydrangea stems so that the sap breaks up.
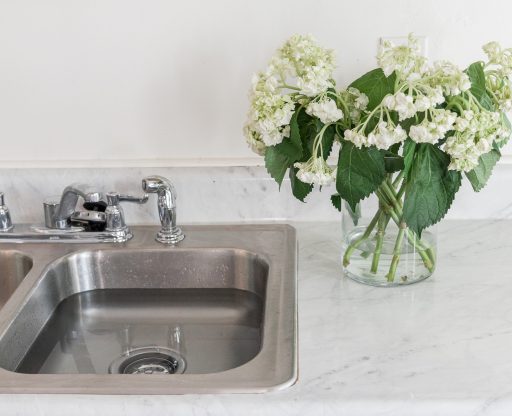
The blooms should slowly revive over the next 12 hours. If you’ve noticed that your hydrangeas died overnight in the past, then try doing this method right before going to sleep. It’s so much fun to wake up to gorgeous blooms.

There you have it: a super simple method for those of you wondering how to revive hydrangeas. At this point, you don’t have to do anything else except enjoy your fresh flowers!
How To Revive Hydrangeas: The Printable Version
How to Revive Wilted Hydrangeas

Materials
Instructions

Leave a Reply