One of my favorite skincare treatments at home is dermaplaning. I also find that dermaplaning is the most misunderstood out of all DIY skincare routines! This is because people primarily think that Dermaplaning can cause the hair on your face to grow thicker than it already is.
By the end of this article, you will learn:
- What dermaplaning is and what it isn’t
- Whether dermaplaning is for you or not
- How to dermaplane at home step-by-step (the right way)
- How to care for your face after dermaplaning
So let’s get going!
Frequently Asked Questions About Dermaplaning
What is dermaplaning?
Dermaplaning is a skincare treatment that exfoliates the skin using razors to take off vellus hair.
Vellus hair is light, short, and fine hair that protects the skin and regulates the body’s temperature. While it may look like it is a functional part of our skin, too much vellus hair can cause oil build-up, clog pores, and encourage acne.
Dermaplaning also removes and discards the topmost layer of the skin which is composed of dead skin cells. This can increase the face’s brightness and improve skin texture.
What is the difference between dermaplaning and shaving?
A common myth that most people believe is that dermaplaning is no different than shaving. Your mother’s mother might have passed this on to you – and that’s okay.
But here’s the thing: your peach fuzz and your terminal hair (the thick, dark hair similar to the hair on top of your head) don’t “grow thicker” after being shaved. Rather, it only grows a blunt and stubbly tip, making it feel thicker initially.
The difference between Dermaplaning and shaving is their main goal. Dermaplaning aims to exfoliate the skin, take off vellus hair, and remove dead skin cells. Meanwhile, shaving focuses on scraping off thick terminal hair to minimize or eliminate its visibility on certain parts of the body, but it has little effect on the actual skin.
Will Dermaplane cause breakouts?
A build-up of excess oil, sebum, and dead skin cells can cause breakouts.
Dermaplaning does the opposite – in fact, it removes these irritants to avoid the skin from breaking out by removing the top layer of dead skin cells that traps dirt inside your pores. Professionals say that the procedure is safe for most skin types, even those with sun damage, fine lines, dry patches, and/or dull skin.
The only caveat is this: you can’t undergo dermaplaning if you have current acne breakouts. Sliding a scalpel over an active bump on your face can worsen existing acne by exposing it to bacteria. If this is the case, you’re better off with gentler exfoliants until you’ve got your acne under control.
You can also simply dermaplane areas of your face where you don’t have acne if you only have a few small breakouts.
Can I Dermaplane if I have dark skin?
Yes! People with dark skin usually have doubts about exfoliating skin treatments because it involves a lot of scrubbing which causes harsh irritation, hyperpigmentation, and micro-abrasions.
But because dermaplaning doesn’t involve any scrubbing, it is considered 100% safe for dark skin. In fact, Dermaplaning helps even out skin tone by allowing the body to produce new skin cells in replacement of the old ones that are removed by the procedure. This makes the overall appearance of the face look vibrant and radiant.
Who cannot go through the procedure?
As I mentioned earlier, Dermaplaning is not a procedure for everyone. Going through with it without further research can be detrimental to your health.
For instance, people with acne may end up exposing their sensitive skin to bacteria which may result in worse cases of breakout.
People who have recently gone outdoors or those with severe sunburn should also postpone treatment (take note that sunburn is different from sun-damaged skin).
If you are undergoing cancer treatment or taking Accutane or tretinoin for the past six months, you should not undergo dermaplaning. This goes with skin tones that are sensitive to hyperpigmentation as well.
People who cannot go through the procedure:
- people with severe sunburn
- people with active breakouts
- people with sensitive skin
- people who have been taking Accutane or tretinoin in the past 6 months
- people with cancer who are undergoing cancer treatment
- People with skin tones that are sensitive to hyperpigmentation
Is Dermaplaning painful?
First of all, Dermaplaning should not be painful. It is actually one of the easiest and gentlest ways to remove vellus hair and dead skin cells in comparison to other techniques such as threading, waxing, and sugaring. The only sensation that you should feel is a gentle tickle or a brushing sensation.
If you’re having the procedure done by a friend or a professional, call them out if you feel like the blade is stinging or sitting too close to your skin. This can put you at risk for micro-tears and abrasions and should definitely not be happening.
Will my peach fuzz go thicker after Dermaplaning?
Peach fuzz, like visible terminal hair, will not grow back thicker or darker just because you shaved it. Biologically, it doesn’t make sense for hair to grow thicker because of shaving.
As I mentioned earlier, shaving only causes the tips of the new hairs to become blunt which is often mistaken as an increase in thickness.
In the case of Dermaplaning, you are dealing with very light and fine hair that are hardly possible to see with the naked eye. This thin hair that you are removing with Dermaplane has very little impact on visibility, even when it starts growing back.
How about my mustache hair?
If you have visible mustache hair, it’s better to wax or shave it rather than dermaplane, especially if the hair is thicker.
It’s also important to note that it isn’t necessary to include your upper lip when Dermaplaning if you recently have waxed or shaved the area.
For people who don’t have mustache hair, no need to worry: the only thing that will grow back is the vellus hairs that you just removed. And just like other hairs in your body, it will not go thicker after the procedure.
Does using oil help before dermaplaning?
We put shaving cream before we shave, so why not follow that principle?
Putting oils or any sort of cream prior to Dermaplaning may look like something decent to do to protect the skin but it actually moistens the dead skin cells and peach fuzz which makes it harder to remove. So avoid using oil if you can, or your dermaplaning at home will be a lot harder.
Can I go through the procedure even if I am older in age?
Of course! Dermaplaning is beneficial and safe for all ages. In fact, this procedure can avoid an excessive production of wrinkles through the process.
Regularly discarding dirt, excess sebum, and dead skin cells can keep your skin looking young and fresh. If you have quite a lot of folds in your skin, just pull the skin tight to keep an even slate when Dermaplaning.
How often can I dermaplane at home?
You can do it as often as you want or need to with the limitation of at least once per week.
How often you can Dermaplane at home really depends on your skin and the blades you use, but the ideal standard is after 3-4 weeks. Doing the procedure once a month is enough to maintain the smoothness and vibrance of your skin.
Is itchiness normal after dermaplaning?
You should not feel any itching after dermaplaning. Perhaps you started with wet skin or your pores are more open than usual. This may also mean that you have generally sensitive skin.
To combat any itchiness, use a light moisturizing cream or cool the area with a jade roller. If the itchiness is severe then your skin may be too sensitive for dermaplaning at home, but this is pretty rare.
Can I wear make-up after dermaplaning?
With a silky-smooth face after Dermaplaning, who wouldn’t want to throw on make-up? It may seem like a perfect time to put on that new foundation, but we recommend waiting 24 to 48 hours before applying any products to your skin. Let your skin breathe for a while.
When is the best time to dermaplane at home?
If you doing this procedure for the first time, it’s best to allot a free day when you don’t have to do strenuous errands that require you to be outside. During this time, you should also be in a relaxed mood. You do not want to rush this process as doing this with pressure may cause accidents.
Before anything else, you need to start on a clean slate. The ideal time for Dermaplaning is after taking a shower and washing your face to avoid excess sebum on your face.
How to Dermaplane at Home:
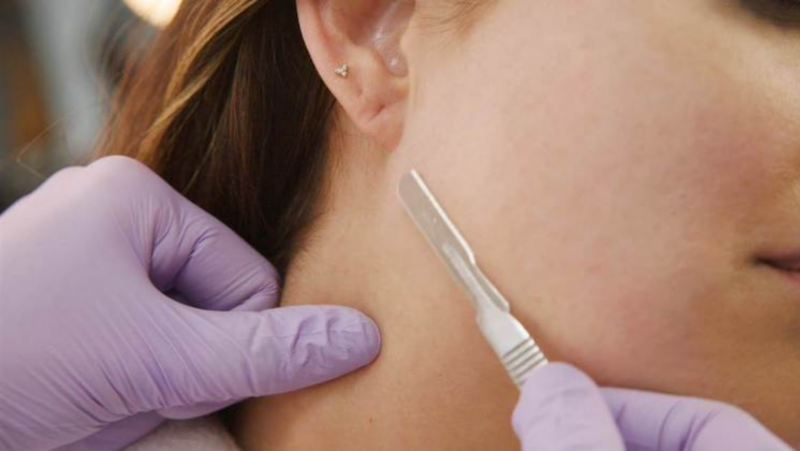
First, Prepare Your Tools
Before anything else, you have to prepare the tools you need for dermaplaning at home. Your tools will definitely make or break your experience!
Below are our top three favorite razors from the least to most expensive options.
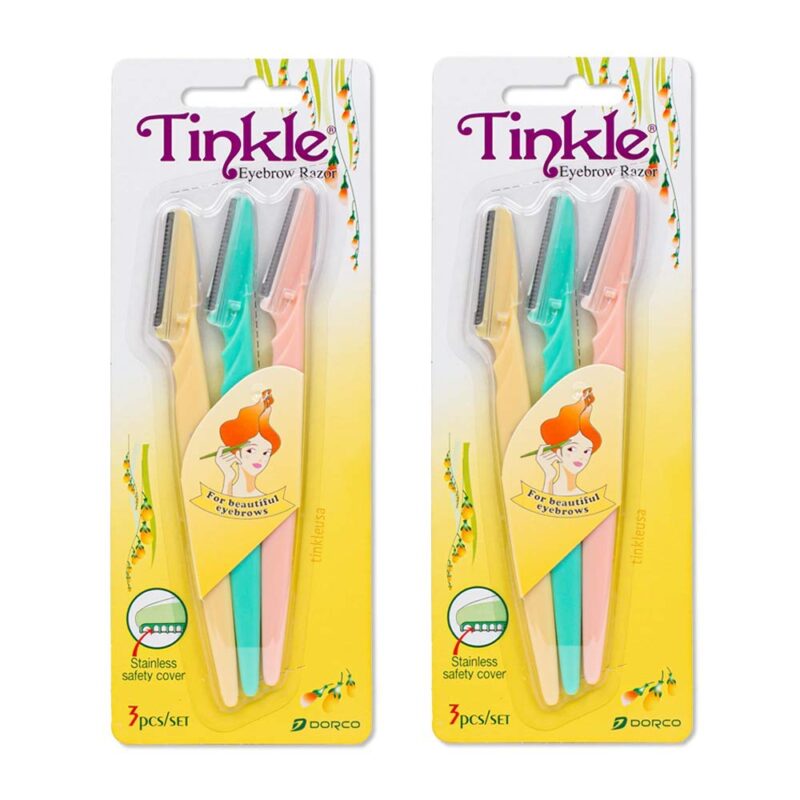
Tinkle razors are loved by celebrities like Whitney Port and beauty Tiktokers like Susan Yara. Tinkle razors are ergonomically shaped for a comfortable grip. At four to five dollars for a set of six, it gets the job done well. It is also the most affordable in the market.
The only downside of these razors is that you can only use this once – which means it is considered disposable after one use.
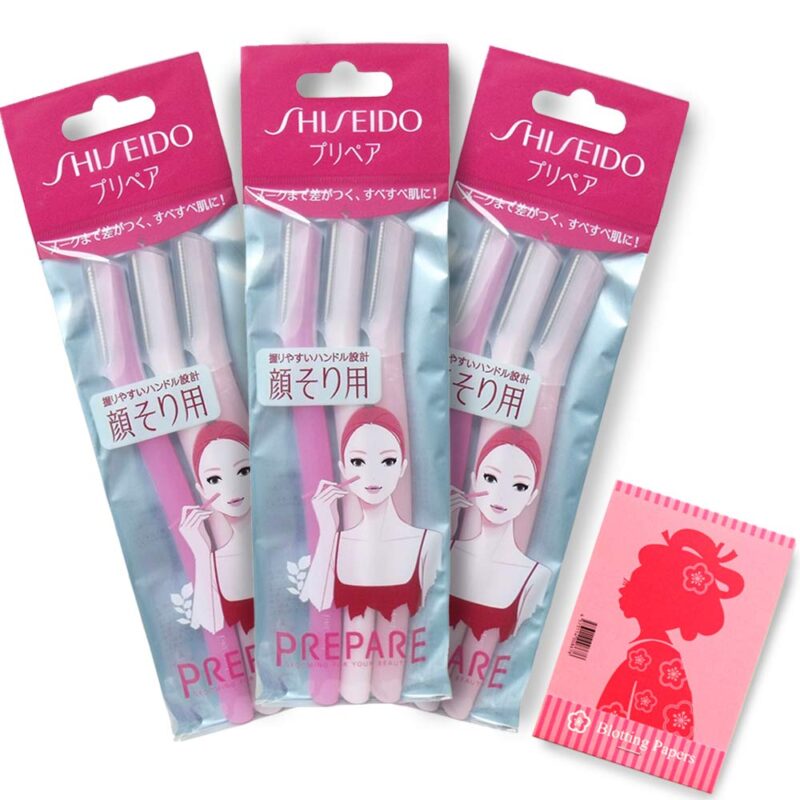
Shiseido razors have a slightly similar concept as Tinkle razors but have better actual razors.
This razor also has a nice grip which is recommended for reaching into tricky areas. Personally, we love using eyebrow and facial razors because they are lighter and more comfortable to hold.
Dermaflash Dermaplaning Device
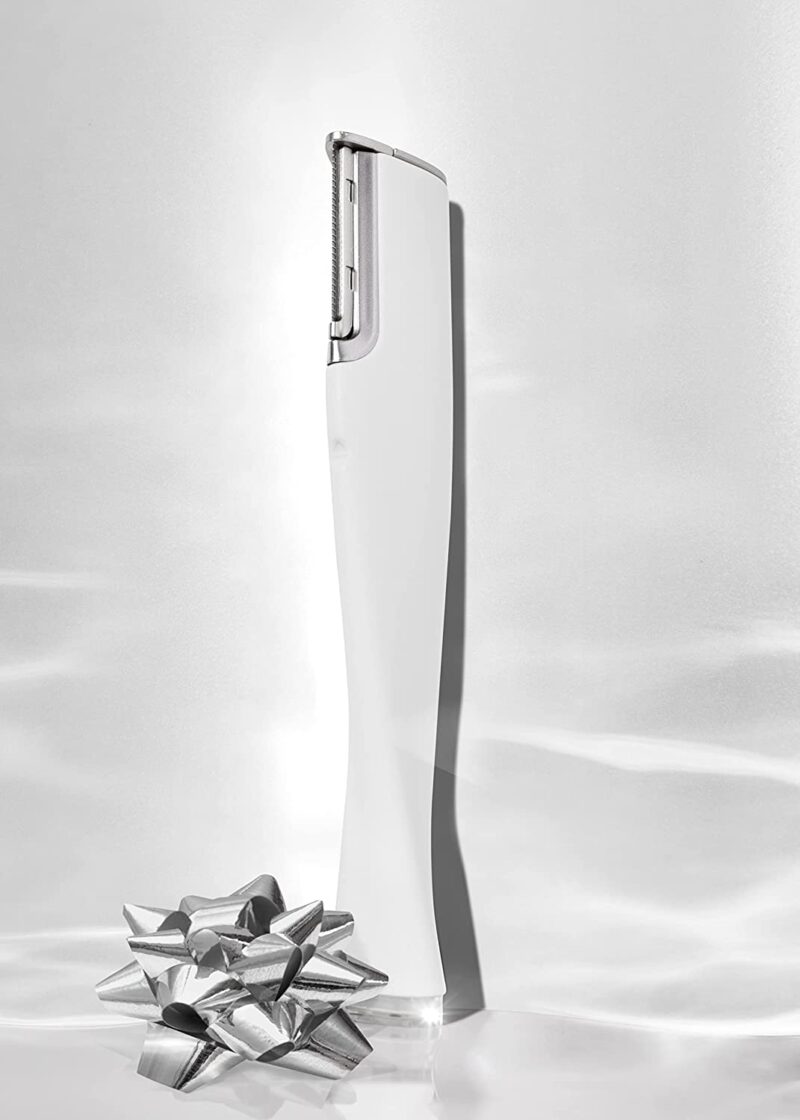
If you’re ready to up your Dermaplaning game, go get yourself a Dermaflash Dermaplaning device!
It has a vibrating function for a deeper (but gentle) shave and comes with a pack of razors to replace old, blunt ones. It is eco-friendly and has a slightly bulky but steady grip. Switching from a disposable razor to a Dermaplaning device may take a while to get used to but it isn’t that much of an issue.
How to Dermaplane At Home: 10 Steps
Step 1:
Before anything else, wash your face with a facial cleanser and put a bit of toner.
Next, place your razor in a downward position. Hold it in a slanted position or a 45-degree angle and pick an area to start with. The ideal area to start with is the skin nearest to your sideburns.
Step 2:
Begin moving downward with little, feather-like strokes. Be cautious – you shouldn’t be pressing hard. Stretch the sides of the skin using the other hand to allow no folds to form while you are doing the procedure.
Take note that you shouldn’t cut your terminal hair (sideburns/eyebrows/upper lip hair). If you recently shaved or waxed your upper lip, you do not have to include that area for Dermaplaning.
Step 3:
Do the same thing on your jawline area and the other side of your face. Remember to pull your skin tight to avoid micro-cuts or abrasions.
If you feel a stinging sensation, your hand might be gripping the razor too hard. The more gentle the better! Take your time or stop to breathe and relax before handling the razor again.
Step 4:
Once you have completed an area, take off the fuzz from the razor and wipe it with a clean rag. This is kind of a common-sense type of thing, but you really don’t want to contaminate other areas with dead skin cells from another spot, especially if this is your first time learning how to dermaplane at home (your skin will be more sensitive during your first session).
Step 5:
When you get to your upper lip, feel free to turn and hold the razor in different ways and angles as needed. Just make sure that the razor is pointing downward to avoid developing ingrown hairs. This part can get a bit tricky, so be patient with yourself.
Step 6:
Proceed to your forehead starting from the surface nearest to the hairline. From there, go downward in gentle strokes. You can include some of the baby hairs sticking out on the topmost area of your forehead if you’d like.
This should be the most satisfying part of Dermaplaning as the forehead tends to have a lot of flaky skin.
Step 7:
When you finish Dermaplaning in one area, do not – I repeat, do not – pass the razor on that same area again. This can cause irritation, micro-cuts or breakouts!
Missing some parts you’re not confident of reaching is not an issue, especially if this is your first time learning how to dermaplane at home. I promise you won’t really notice missed spots. Better safe than sorry here!
Step 8:
When dermaplaning, the hardest areas should come last. When you reach your nasal sidewall, be careful not to nick or slice the bridge of the nose or the cheek.
Be mindful when holding your razor and make sure you’re dealing with an even surface. You don’t have to include every single area, as I mentioned before.
Step 9:
After you’ve finished all the areas that you can reach, rinse your face with water. Do this thoroughly. Dry it off with a microfiber towel by carefully patting it on your face. Do not scrub or rub the towel!
Step 10:
Last but not least, do your after-care routine. Apply a small pearl-sized amount of your favorite mineral-packed facial booster.
Follow it with the same amount of smoothing serum and moisturizing cream.
If you plan to go outdoors within 24-hours, apply a good amount of sunscreen to protect your peach-fuzz-free face from irritants. Remember that your face will be more exposed than it ever has been before, so be gentle with your skin.
What are the after-care techniques I can use?
1. Apply a Facial Booster (Optional)
One of my favorite after-care products is Vichy Mineral 89 Daily Booster. This contains tons of minerals including volcanic water, hyaluronic acid, glycerin, and soothing water.
After rinsing your face, put a couple of drops on your damp skin. It’s non-stick, soothing, and light. This product also has anti-aging and UV protection properties which makes it a good addition to your daily routine, not just after dermaplaning at home.
2. Soothing Serum
The next step is to apply something that soothes the skin. After applying the booster, apply a layer of Avene’s Hydrance Intense Serum. I particularly love this serum because of its patented ingredient called the Cohederm, which restores the skin hydrolipidic film (responsible for protecting against water loss and bacteria).
3. Moisturizing Cream
I like locking all the nutrients I just put on my face with a moisturizing cream. It’s like a sealer that doubles as a soothing cream as well. If your moisturizing cream highlights ingredients with minerals and vitamins, you can skip the first and second products and start with this instead.
You can use your go-to moisturizing cream or use our favorite Creme de la Mer. Doesn’t leave an icky feeling, guaranteed! This cream also minimizes the appearance of wrinkles and instantly repairs skin damages, which makes it worth every penny.
4. Sunscreen
Because you just removed vellus hair (that protects your skin from exposure) from your face, applying sunscreen is the most important step in after-care. Extra amounts should be applied if you will be staying outside.
Our favorite sunscreen is La Roche Posay: Anthelios 60 Melt-in Sunscreen Milk. It’s smooth, silky, and fuss-free. It leaves a milky appearance after application but transforms into a fresh glow after a few minutes. Love it so much!
Hopefully, by now you know how to dermaplane at home, each step of the way! Remember to go as gently as possible and work your way up during each session for maximum hair removal. Good luck!


Leave a Reply